Here's how to record 360° videos using your Pilot Pano, and share them using AVATOUR.
Step 1: Navigate to the Camera app and record content
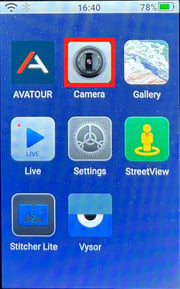
First, click the Camera application on your Pilot Pano camera.
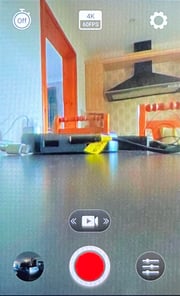
Once you're in the Camera app, select the camera icon in the bottom middle of the screen, and choose 360 Video. This mode is recommended for recording content and is the icon with the play thumbnail located inside of it as pictured below.
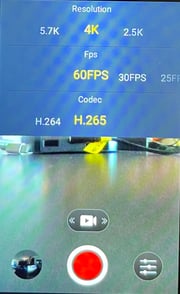
Once in 360 Video mode, press the resolution/frame rate indicator at the top of the screen. Verify that your Resolution is set to 5.7K, FPS is 30FPS, and Codec is H.265.
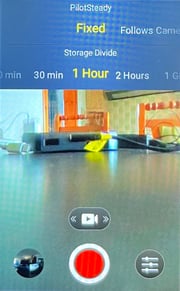
Next, click the gear icon in the top right of the screen, and check that PilotSteady is set to Fixed and Storage Divide is 1 Hour.
Recommended settings:
- Resolution is 5.7K (highest)
- FPS is 30FPS
- Codec is set to H.265 to reduce file size and upload times
- PilotSteady is Fixed
- Storage Divide is set to 1 Hour so files are split up especially for very long recordings.
Step 2: Post-Recording Stitching
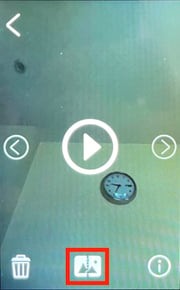
Once you've finished recording, the video file will be saved and viewable in the Gallery app from the home screen. Your videos will not be stitched yet, and therefore can not be uploaded to Avatour.
Open the Gallery app, and select your video. Next, click the stitching icon at the bottom of the screen. If you have protective lenses on the camera, choose Protective Lenses and Start Stitch. (Cameras purchased as part of an Avatour Kit generally do have plastic protective lenses attached.) Otherwise, select No Fittings and Start Stitch.
Once the stitching process is complete, you can now upload this file from our Avatour application.
Step 3: Uploading to Host Dashboard
Pilot Pano camera users are able to upload videos and assets via the Avatour application on the device. The tutorial below is a step-by-step walkthrough to access and upload offline media.